Product Highlights
• 24.5” 1920x1080 Native HD Resolution
• State-of-the-art AM-OLED Technology
• 1:1 Pixel Mapping Modes for SD/HD
• Supports TVLogic Color Calibration Utility for proper
color alignment
• Supports Multi-point Calibration for RGB and White
uniformity correction
• Supports 3D LUT & Adjustable Gamma(1.0 to 3.0) and
user-defined mode
• Supports 3rd party 3D LUT formats for import and
export
• Firmware update by using Ethernet or USB
• Timecode Display (VITC/LTC)
• Waveform/Vectorscope (Y/Cb/Cr, RGB Wide type, Line
waveform and Range Error)
• Marker / User Aspect
• GPI (RJ45)
• Blue Only/Mono
• X3 Zoom(PBP)
• Key lock
• H/V Delay
• UMD (ANC, Manual, Dynamic & User)
• Closed Caption: CEA- 608/708 (SDI), Line 21, ANC, OP-42,
OP-47
※ Note : 3D LUT Input/Output function will be supported in the upcoming Utility S/W scheduled to be released in July 2014.
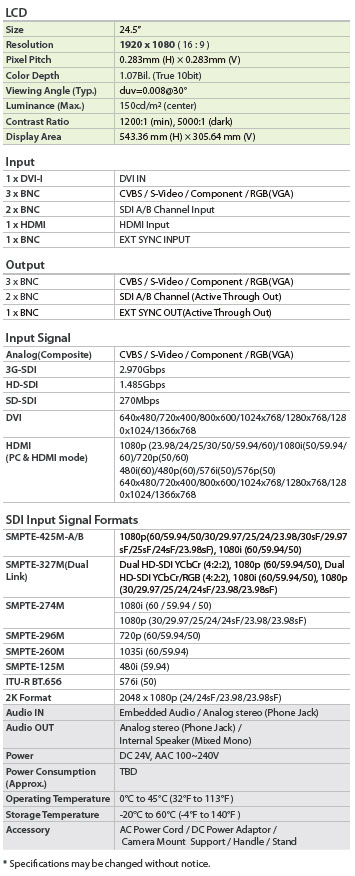
Display Spec
| Size |
24.5" |
| Resolution |
1920 X 1080 (16 : 9) |
| Pixel Pitch |
0.283mm |
| Color Depth |
1.07B |
| Viewing Angle |
duv=0.008@30° |
| Luminance |
150cd/m2 |
| Contrast Ratio |
1200:1 (min), 5000:1 (dark) |
| Display Area |
543.36(H) × 305.64(V) mm |
Input
| 1 X BNC |
Analog Input (Composite) |
| 3 X BNC |
Analog Input (Component) |
| 2 X BNC |
3G-SDI A/B Channel Input |
| 1 X HDMI |
HDMI Input |
| 1 X DVI |
DVI Input |
Output
| 1 X BNC |
Analog Output (Composite) |
| 3 X BNC |
Analog Output (Component) |
| 2 X BNC |
3G-SDI A/B Channel Output |
Input Signal
| Analog |
CVBS / S-Video / Component Video / RGB(D-TV) |
| 3G SDI |
2.970Gbps |
| HD SDI |
1.485Gbps |
| SD SDI |
270Mbps |
| HDMI |
1080p (23.98/24/25/30/50/59.94/60)/1080i(50/59.94/
60)/720p(50/60)
480i(60)/480p(60)/576i(50)/576p(50)
640x480/720x400/800x600/1024x768/1280x768/
1280x1024/1366x768 |
| DVI Analog |
640x480/720x400/800x600/1024x768/1280x768/
1280x1024/1366x768 |
SDI Input Signal Formats
| SMPTE 425M-A/B |
1080p (60/59.94/50/30/29.97/25/24/23.98/30sF/
29.97sF/25sF/24sF/23.98sF) / 1080i (60/59.94/50) |
| SMPTE 372 |
Dual HD-SDI
YCbCr(4:2:2)
1080p (60/59.94/50)
Dual HD-SDI
YCbCr/RGB(4:4:4)
1080i (60/59.94/50)
1080p (30/29.97/25/24/
24sF/23.98/23.98sF) |
| SMPTE 296 |
720p (60/59.94/50) |
| SMPTE 274 |
1080i (60 / 59.94 / 50)
1080p (30/29.97/25/24/24sF/23.98/23.98sF) |
| SMPTE 260 |
1035i (60/59.94) |
| SMPTE 125 |
480i (59.94) |
| ITU-R BT.656 |
576i (50) |
| 2K Format |
2048 x 1080p (24/24sF/23.98/23.98sF) |
Audio
| Audio In |
Embedded Audio/Analog Stereo (Phone Jack) |
| Audio Out |
Analog Stereo (Phone Jack), Internal Speaker(Mono) |
FPGA Functions
|
1:1 Pixel Mapping Modes for SD/HD, 3G-SDI Level A/B, Audio Level Meter Display, Blue Only, H/V Delay, Key Lock, Luma(Y') Zone Check, Marker, Mono, Range Error, Time Code Display, UMD, User Aspect, Various Scan Modes, Waveform/Vector, X3 Zoom(PBP)
|
Closed Caption
|
CC-608 ANC, CC-608 LINE 21, CC-708, OP42, OP47
|
Calibration
|
TVLogic Color Calibration Utility, 3D LUT & Adjustable Gamma, 3rd Party 3D LUT Import, Uniformity Correction
|
Other Functions
| Reference Sync input |
EXT_Sync in |
| REMOTE |
GPI (RJ45) |
| REMOTE |
TVLogic’s specification |
| USB |
AUTO Calibration |
Firmware update by USB memory stick |
| Ethernet |
Ethernet Control support |
Options
|
Carrying Case, External Acrylic Filter, Gold Mount, Rack Mount Kit(Single), V-Mount
|
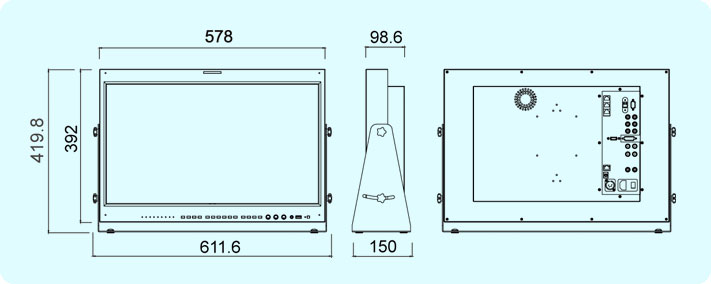
Dimensions
- Main Body : 578 x 392 x 98.6 (mm) / 22.76 x 15.43 x 3.88 (inch)
- With stand : 611.6 x 419.8 x 150 (mm) / 24.1 x 16.5 x 5.9 (inch)
- Weight : 11.8Kg / 26.01lbs
[Release Notes]
Date : 17. 02.08
[LEM-250A [MCU Firmware Update : V2.07 -> V2.08]
1. Color Temperature IC Chip has been changed from atmel to microchip.
Date : 16. 11.15
[LEM-250A [FPGA C : V01 / MCU Firmware Update : V2.06 -> V2.07]
1. AUTO Mode/Fuction that can detect Psf automatically is added.
- AUTO Mode/Fuction is added to Force Psf in the OSD menu.
- Default : AUTO
2. The "No signal" statement will no longer appear when the monitor is turned on or video signal is changed.
Date : 16. 05.02
[LEM-250A [FPGA C : V01 / MCU Firmware Update : V2.04 -> V2.05]
1. Revised firmware due to changing Mainbaord for LEM-250A(MB002) (2015.11).
2. Updated AM1808, FPGA, and MCU due to changing Xilinx FPGA Deserialize.
3. Debugged screen noise when switching a signal as Deserialize changed.
* If your LEM-250A on OSD is MCU 2.04 ver, you must do as followings: OSD메뉴에서 MCU Version이 2.04 이하일 경우 다음과 같은 절차를 거쳐야함.
1. Upgrade the LEM-250A by using [LEM-170_250A_Pre_Upgrade.img] file first.
2. Then, upgrade the LEM-250A by using [LEM-170_250A_G001_F030301_C205_A1_14(new firmware).
* Caution
Attached [LEM-170_250A_G001_F030301_C205_A1_14] is not the latest firmware.
It was updated in November, 2015.
Date : 16. 02.24
[LEM-250A [MCU Firmware Update : V2.05 -> V2.06]
1. Added [Ext. Sync Position H, V] feature.
Date : 15. 08.21
[LEM-250A [MCU Firmware Update : V2.03 -> V2.04]
1. Added Capture Mode.
2. Debugged connection error when re-connecting DVI cable.
3. Debugged screen scroll problem when using Router or booting of a monitor.
4. Debugged Deinterlace problem in Uncer Scan Mode.
5. Debugged pop-up noise when changing Audio Volume 0 to 1.
Date : 15. 02.26
[LEM-250A [MCU Firmware Update : V2.02 -> V2.03] [AM1808 Update : 1313 -> 1314][FPGA B 02 -> 03]
1. Debugged to connect i1 Display Pro Probe.
2. Debugged USB copy problem when using Calibration log copy feature.
3. Debugged i1 Display Pro Probe Measurement function.
4. Debugged Switching delay (Interlace signal)
Date : 14. 10.08
[LEM-250A [MCU Firmware Update : V2.00 -> V2.01] [AM1808 Update : 1312 -> 1313][FPGA A 01 -> 02, FPGA B 01 -> 02]
1. Debugged output of an audio as in 3G Level B.
2. Debugged Audio Mute when changing signals.
Date : 14. 08.13
[LEM-250A [MCU Firmware Update : V2.00 -> V2.01] [AM1808 Update : 1312 -> 1313][FPGA A 01 -> 02, FPGA B 01 -> 02]
1. Improved Black when Flicker Mode Off feeding 50i.
* After upgrading MCU 2.01, you must calibrate the LEM-250A.
** When you calibrate the monitor, you must use our calibration software, Calibrator 1.6.8.R1 or the latest version.
Date : 14. 07.10
[LEM-250A [MCU Firmware Update : V1.01 -> V2.00] [AM1808 Update : 1312 -> 1313][FPGA A 01 -> 02, FPGA B 01 -> 02]
1. Improved Color quality
12bit Dithering : 3D LUT(12bit interpolation), 1D LUT(12bit depth)
1D LUT Bypass
2. Add Color copy on Observer.
3. Debugged Closed caption 608(L21).
Date : 14. 05.22
[LEM-250A [MCU Firmware Update : V1.0 -> V1.01] LEM-250A [AM1808 Update : 1311 -> 1312]
1. Change the name,Clear Motion into Flicker Mode on OSD.(Default is ON)
2. Activate LUT Conversion if turned Flicker Mode on
3. Add Jeti Specbos 1211 probe.